Tools
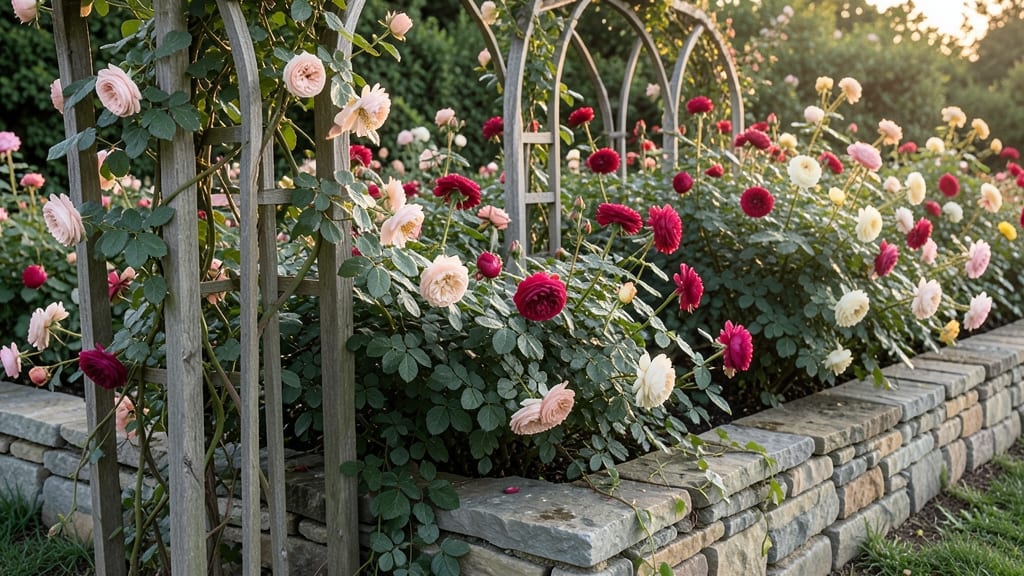
Creating a cottage garden flower bed starts with a wild, romantic vision—think roses tumbling over trellises, lavender swaying in the breeze, and delphiniums reaching for the sky. 🌸 My first attempt looked like a chaotic dream, but once I learned to layer plants by height and texture, the magic unfolded.
The key isn’t perfection; it’s letting nature’s charm guide you.
The secret lies in mixing tall drama (like delphiniums or hollyhocks) with mid-height fillers (roses, peonies) and low-spreading plants (lavender, thyme). Add a few unexpected textures—feathery ferns, spiky grasses—to keep it from feeling too neat.
This layered approach hides bare soil, extends the blooming season, and makes weeding easier (trust me, it works).
By summer’s end, you’ll have a bed that smells like a sun-drenched English meadow, with blooms from spring through frost. The roses perfume the air, the lavender repels pests, and the delphiniums add height for hummingbirds to visit.
It’s not just a garden—it’s a living postcard that changes with every season.
Works in any sunny spot, from small city yards to sprawling country plots. The only rule? Let it grow a little wild—because that’s where the real cottage garden magic happens.
📚 In This Guide
- What you need
- Instructions
- Tips and common mistakes
- Wrapping up and next steps
What you need
- ● Soil: 2–3 cubic yards of high-quality garden soil or a mix of topsoil and compost (aim for a loose, well-draining blend).
- ● Mulch: 2–3 bags of organic mulch (straw, shredded bark, or pine needles) to retain moisture and suppress weeds.
- ● Fertilizer: A slow-release balanced fertilizer (10-10-10 or 5-10-5) or organic options like composted manure or bone meal.
- ● Plants: A curated selection of perennials, annuals, and shrubs suited to your climate (e.g., peony, lavender, foxglove, hollyhock, and sweet alyssum). Plan for 3–5 plants per square foot, mixing heights and bloom times.
- ● Edging: Brick, stone, or metal edging (1–2 feet wide) to define your bed and keep mulch in place.
- ● Garden shovel and trowel for digging and transplanting.
- ● Garden fork to loosen compacted soil.
- ● Wheelbarrow for hauling soil, mulch, and plants.
- ● Pruners or shears for trimming and shaping.
- ● Garden hose with a spray nozzle for watering.
- ● Gloves (heavy-duty for digging, lightweight for delicate plants).
- ○ Knee pads (optional but highly recommended for comfort!).
- ● Decorative accents: Garden stakes, trellises, or obelisks for climbing plants like clematis or roses.
- ● Birdhouses or feeders to attract pollinators and add whimsy.
- ● Solar-powered lights for evening ambiance.
- ● Rain gauge to monitor watering needs.
- ● Plant markers (chalkboard or wooden) to label your blooms.
Step-by-step instructions for designing a cottage garden flower bed
Here's the method I've used for years to create lush, layered flower beds that bloom from spring through fall.
🌿 Step 1: Plan Your Planting Layers for Season-Long Interest
Cottage gardens thrive on height variation and continuous color. Start by sketching three layers: back (tall perennials like delphiniums or hollyhocks), middle (mid-height blooms like peonies or black-eyed Susans), and front (low-growing annuals like pansies or sweet alyssum). I always allocate one-third of space to each layer—this creates natural balance without overcrowding.
Select plants with staggered bloom times so something always flowers. For example, pair early spring bulbs (tulips, daffodils) with summer perennials (coneflowers, lavender) and late-season annuals (zinnias, cosmos). This ensures your bed never looks bare. I like to include at least three different foliage textures—feathery (ferns), broadleaf (hostas), and needle-like (shrubby perennials)—for visual depth.
🪴 Step 2: Prepare the Soil for Nutrient-Rich Growth
Dig the bed to a depth of 12-18 inches, breaking up compacted soil with a garden fork. Cottage gardens love rich, well-draining soil, so amend with 3-4 inches of compost mixed into the top 6 inches of soil. I add a handful of bone meal for phosphorus (root development) and kelp meal for micronutrients—this gives plants a strong start.
For existing lawns, mark the bed outline with spray paint, then remove turf using a sod cutter or spade. Turn the removed sod upside down and let it dry for 2-3 days before composting. This prevents weeds from sprouting in your new bed. After amending, water deeply to settle the soil—you'll know it's ready when the surface looks slightly firm but still crumbly.
☀️ Step 3: Plant in Odd Numbers for Natural Flow
Cottage gardens feel organic, so avoid rigid rows. Plant 3, 5, or 7 of each variety in loose clusters, leaving 18-24 inches between plants for mature growth. Dig holes twice as wide as the root ball and just as deep—this encourages roots to spread outward. Gently tease apart roots if they're circling before placing the plant in the hole.
I always plant tallest in back, medium in middle, shortest in front, but leave 12-18 inches of space at the front edge for low annuals or ground covers. Water each plant immediately after setting it in the hole to eliminate air pockets. Mulch with 2-3 inches of shredded bark or straw to retain moisture and suppress weeds—keep mulch 2 inches away from plant stems to prevent rot.
💧 Step 4: Water Deeply and Establish a Maintenance Routine
Water newly planted beds once daily for the first week, then taper to every other day as plants establish roots. The soil should feel damp 3-4 inches down—use a screwdriver to check. I set a drip irrigation system on a timer for 30 minutes twice daily to keep moisture consistent without overwatering.
After two weeks, switch to deep watering 2-3 times weekly—this encourages strong root systems. Fertilize lightly with a balanced organic fertilizer (10-10-10) every 6-8 weeks during the growing season. Deadhead spent blooms regularly to prolong flowering, but leave some seed heads for winter interest and wildlife.
✂️ Step 5: Prune and Refresh Seasonally for Continuous Bloom
In early spring, cut back perennial stalks to 6 inches tall and remove any dead foliage. This stimulates new growth and prevents disease. I also divide overcrowded perennials (like hostas or daylilies) every 3-4 years to maintain vigor—dig up clumps, split with a sharp knife, and replant sections.
In late summer, add annuals like marigolds or snapdragons to fill gaps left by finished perennials. In fall, cut back tall perennials to 12-18 inches and leave seed heads for birds. Apply a 2-inch layer of mulch before winter to insulate roots. This seasonal care keeps your cottage garden thriving with minimal effort.
Tips & tricks for perfect cottage garden flower beds
Creating a cottage garden that bursts with color all season takes more than just throwing plants in the ground—it's about the details that make it truly magical.
Layering Like a Pro: When planning your three layers (back, middle, front), think vertically first. The tallest plants in the back should be at least 3-4 feet tall at maturity, while middle plants should reach 18-24 inches and front plants stay under 12 inches. I always sketch a quick vertical profile to visualize how each plant will look when fully grown—this prevents that awkward "everyone can see my back row" moment.
Soil Secret for Thriving Plants: The 12-18 inch deep soil preparation isn't just about depth—it's about creating a loose, aerated environment for roots. After mixing in your 3-4 inches of compost, I like to add a handful of worm castings (optional but game-changing) to the top 2 inches of soil. This gives plants an immediate nutrient boost and improves soil structure. The key is to work the amendments into the top 6 inches—don't just pile it on top!
Planting Precision: That 18-24 inch spacing between plants might seem generous, but it's crucial for mature growth. I measure from the center of one plant to the center of the next to ensure consistent spacing. For plants with circling roots, gently tease them apart before planting—this encourages outward root growth rather than a tight root ball. And here's a pro move: water each plant immediately after setting it in the hole to eliminate air pockets that can cause wilting.
Watering Wisdom: The 30 minutes twice daily drip irrigation schedule works wonders, but only if you set it up properly. Place emitters at the base of each plant (not over the foliage) and bury them slightly to prevent evaporation. For the first week, check soil moisture 3-4 inches down—if it's dry, increase to 30-45 minutes per session. After two weeks, you can reduce frequency but increase duration to encourage deeper root growth.
Pro Tips for Cottage Garden Flower Bed
- Creating a cottage garden that bursts with color all season takes more than just throwing plants in the ground—it's about the details that make it truly magical.
- Layering Like a Pro: When planning your three layers (back, middle, front), think vertically first.
- Soil Secret for Thriving Plants: The 12-18 inch deep soil preparation isn't just about depth—it's about creating a loose, aerated environment for roots.
Frequently asked questions
Got questions about creating your dream cottage garden flower bed?
Here are some of the most common ones—plus practical answers to help you design with confidence!
What’s the best time of year to plant a cottage garden flower bed?
Aim for early spring (after the last frost) or fall (6-8 weeks before your first frost) for the best root establishment. Perennials thrive when planted in cooler weather, while annuals can go in once soil warms. Pro tip: If you’re in a mild climate, you can plant year-round!
Do I need to remove all grass before planting?
Not necessarily! For a low-maintenance approach, use cardboard or thick layers of newspaper to smother grass, then top with 4-6 inches of mulch or compost. Over time, the grass will decompose. For a cleaner look, dig out grass in small sections—just be patient. Warning: Avoid herbicides before planting!
How do I keep weeds from taking over my flower bed?
Start with landscape fabric under mulch or use living mulches like clover to suppress weeds naturally. Hand-pull weeds early (before they seed!) and apply 3-4 inches of organic mulch (straw, wood chips, or shredded leaves) to block sunlight. Bonus: Dense planting with perennials reduces gaps where weeds grow.
How often should I water a cottage garden flower bed?
Water deeply 1-2 times per week (or daily in extreme heat) to encourage strong roots. Aim for 1 inch of water per week, including rainfall. Morning watering is best—it reduces evaporation and fungal risks. Let soil dry slightly between waterings to prevent root rot, but keep it moist for young plants.
Can I mix vegetables or herbs into my cottage garden flower bed?
Edible flowers (like nasturtiums or pansies) and herbs (basil, thyme) thrive in cottage gardens. Just avoid planting heavy feeders (like tomatoes) near delicate flowers—they’ll compete for nutrients. Design tip: Group edibles near paths or borders for easy harvesting!
How do I prepare my flower bed for winter?
Cut back dead or diseased foliage but leave seed heads and perennials for winter interest. Add a 3-inch layer of mulch (straw or shredded leaves) to insulate roots. Pro move: Label plants with stakes so you remember what’s where in spring!
Wrapping up and next steps
Creating a cottage garden flower bed is all about embracing nature’s whimsy—layering textures, colors, and seasonal blooms for a garden that feels alive year-round. 🌸 Whether you’re a seasoned gardener or just starting, the key is patience, creativity, and a love for romantic chaos.
With the right plants, soil prep, and a little tender care, your space will burst with charm, offering pollinators a feast and your soul a retreat.
Now that you’re armed with tips and answers, roll up your sleeves! Start small—pick a sunny spot, sketch your design, and let your garden grow into something uniquely yours. Happy planting! 🌿