Flowers
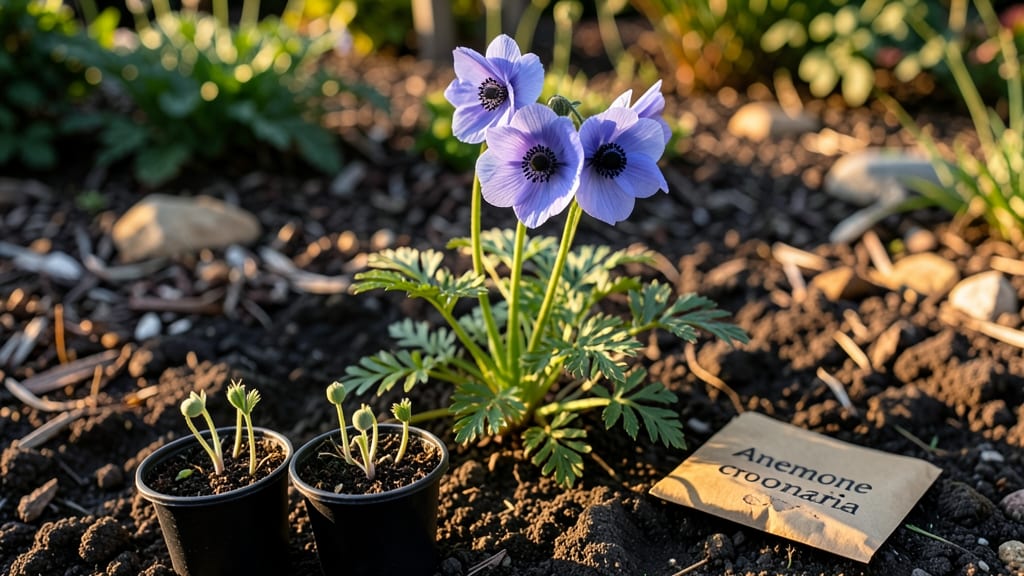
Growing anemone flower seeds from scratch unlocks Pacific Northwest gardens to a hummingbird magnet with frost-resistant blooms that defy early spring chills. 🌱 I’ve watched these delicate, wind-swaying flowers transform barren beds into living tapestries—starting with just a pinch of tiny, slow-to-wake seeds.
The trick isn’t forcing speed; it’s patience and the right conditions that coax them into those signature silky petals by late summer.
You’ll need a cool-season soil mix (60% peat, 30% perlite, 10% compost) and a bright windowsill or seedling heat mat—nothing fancy. Anemones despise heat, so keep temps between 60-65°F during germination, which can take 3-6 weeks (yes, that’s normal).
The real secret? Stratification: a 4-week cold spell in the fridge mimics winter, breaking dormancy before planting. My first batch failed because I rushed—don’t make that mistake.
By late spring, you’ll transplant sturdy seedlings into partial shade (they’ll thank you later with fewer floppy stems). Space them 12-18 inches apart—they’ll spread, but not aggressively. The payoff?
Clusters of cup-shaped blooms in whites, blues, and deep purples that hummingbirds can’t resist, plus frost tolerance that keeps them blooming into November in mild climates. Even my black thumb’s seen these bounce back from snow.
Here’s the kicker: anemones self-seed like crazy if you let them. Once established, they’ll naturalize into low-maintenance drifts that multiply yearly. The only real challenge is rotting seeds—keep soil moist but not soggy, and you’re golden.
Ready to turn your garden into a hummingbird buffet? Let’s get those seeds started.
📚 In This Guide
- What you need
- Instructions
- Tips and common mistakes
- Wrapping up and next steps
What you need
- ● Anemone flower seeds: Choose between Anemone coronaria (spring-blooming) or Anemone hupehensis (late summer/fall blooms). Buy 1-2 packets (50-100 seeds each) for a small garden or 3+ packets for a full border.
- ● Well-draining potting mix: 1-2 bags (12-18 qt) of a blend designed for perennials or bulbs (e.g., Pro-Mix BX or FoxFarm Soil). Avoid heavy garden soil.
- ● Containers or seed trays: Option 1: 4-6 cell packs (for seedlings) or 1-2 seed-starting trays (10x20 inches).
- ● Option 2: 2-3 small pots (4-6 inches in diameter) with drainage holes.
- ● Seed-starting soil: 1 small bag (5 qt) of lightweight, sterile mix (e.g., Jiffy Mix or coconut coir).
- ● Watering can or spray bottle: With a fine-mist nozzle for gentle watering.
- ● Clear plastic wrap or humidity dome: To retain moisture while seeds germinate.
- ● Gloves: A pair of gardening gloves to protect hands from soil and thorns (some anemones have prickly stems!).
- ● Small hand trowel: For gently pressing seeds into soil (3-4 inches long).
- ○ Grow lights or sunny windowsill: Optional but helpful—seeds need 6-8 hours of light/day for strong seedlings.
- ○ Fertilizer (low-nitrogen): Optional—use a balanced 10-10-10 or 5-10-10 fertilizer after seedlings sprout (follow package instructions).
- ● Outdoor space (Zone 4-9): Anemones thrive in partial shade with well-draining soil. Choose a spot with morning sun and afternoon shade.
- ● Patience! Germination can take 2-4 weeks—don’t rush it!
How to grow anemone flowers from seed in the Pacific Northwest
Here's the method I've used for years to bring these frost-hardy blooms to life—perfect for PNW gardens.
🌱 Step 1: Stratify Seeds for Successful Germination
Anemone seeds need cold stratification to break dormancy, mimicking winter conditions. Place seeds in a sealed plastic bag with a damp paper towel and refrigerate for 6-8 weeks. Check weekly—they should feel slightly damp but not soggy. This cold treatment tricks the seeds into thinking winter has passed, signaling them to germinate when spring arrives.
I like to label the bag with the variety and date to avoid confusion. Once stratification is complete, you'll see the first signs of life—tiny white roots breaking through the seed coat. This is your cue that the seeds are ready for planting, usually aligning with late winter in the PNW.
💧 Step 2: Sow Seeds in Well-Draining Soil
Fill 4-inch pots with a mix of 50% potting soil and 50% perlite to ensure excellent drainage—anemones despise soggy roots. Plant seeds ¼ inch deep, spacing them 1 inch apart in the pot. Gently press the soil around them to create good seed-to-soil contact, but don’t compact it too tightly.
Water lightly with a spray bottle until the soil surface looks evenly moist but not saturated. Place the pots in a cool, bright location (around 50-55°F) where they’ll receive indirect light. Avoid direct sunlight at this stage—it can dry out the delicate seedlings too quickly. You’ll see the first tiny sprouts in 2-4 weeks, but don’t be surprised if germination takes longer in cooler PNW conditions.
☀️ Step 3: Acclimate Seedlings to Outdoor Conditions
Once seedlings have 2-3 true leaves (not just the initial cotyledons), it’s time to harden them off. Start by moving the pots to a shaded outdoor spot for 1-2 hours the first day. Gradually increase their outdoor time over 7-10 days, eventually leaving them outside all day but still protecting them from direct afternoon sun.
Anemones thrive in partial shade, especially in the hotter months of PNW summers. You’ll notice their leaves develop a deeper green as they adjust, and their stems will strengthen. By the time they’re ready for transplanting (after the last frost), they’ll be sturdy enough to handle the garden’s conditions.
🪴 Step 4: Transplant to Final Location
Choose a moist, well-draining spot with partial shade—think dappled sunlight or morning sun with afternoon shade. Dig holes twice as wide as the root ball but only as deep as the pot’s height. Space plants 12-18 inches apart to give them room to grow without competing for nutrients.
Water deeply after transplanting to help settle the soil around the roots. Mulch with 2-3 inches of organic mulch (like shredded bark) to retain moisture and suppress weeds. Anemones are frost-resistant, so they’ll survive PNW winters with ease—just make sure the soil doesn’t dry out completely during dry spells.
✂️ Step 5: Maintain and Encourage Blooms
Water 1-2 times per week, depending on rainfall, keeping the soil evenly moist but not waterlogged. Fertilize lightly in early spring with a balanced, slow-release fertilizer (like 10-10-10) to encourage healthy growth. Avoid heavy feeding—anemones prefer nutrient-rich but not overly fertile soil.
Deadhead spent blooms regularly to encourage more flowers and prevent self-seeding if you don’t want volunteer plants popping up elsewhere. In the fall, cut back foliage to 2-3 inches above the ground and add a light layer of mulch to protect the roots over winter. With proper care, your anemones will return year after year, attracting hummingbirds and adding beauty to your garden.
Tips & tricks for growing anemone flowers in the Pacific Northwest
These practical tips will help you navigate the quirks of growing anemone seeds—especially in our unpredictable PNW climate.
Stratification Timing: The 6-8 week cold stratification period is non-negotiable for anemone seeds, but don't worry if your fridge isn't exactly 35-40°F. What matters is consistency—just keep those seeds damp and check weekly. I've had success with fridge temps ranging from 34-42°F, though germination may take slightly longer at the warmer end. The key is maintaining that damp paper towel environment without letting it get soggy.
Soil Mix Secrets: That 50/50 potting soil to perlite mix in Step 2 is crucial for preventing soggy roots, but here's a pro move: add a handful of coarse sand to the mix for even better drainage. Anemones hate wet feet, and this extra grit helps prevent compaction. If you're using garden soil, mix in at least 30% perlite or vermiculite—native PNW soils can be too dense for these delicate seedlings.
Lighting Strategy: When placing your pots in that cool 50-55°F spot with indirect light, think "dappled shade" rather than full shade. A north-facing window or a spot under a sheer curtain works perfectly. If you don't have ideal lighting, consider a grow light on a timer for 12-14 hours daily. The goal is to prevent leggy seedlings while keeping them from drying out—anemones are particularly sensitive to both extremes during this stage.
Hardening Off Hack: During the 7-10 day hardening off process in Step 3, I've found that moving pots to a spot with morning sun and afternoon shade works better than full shade all day. This gradual sun exposure helps seedlings develop stronger stems for when they eventually get transplanted. Watch for color changes—the leaves should darken slightly as they acclimate, which is your sign they're ready for more sun exposure.
Pro Tips for Anemone Flower Seeds
- These practical tips will help you navigate the quirks of growing anemone seeds—especially in our unpredictable PNW c...
- Stratification Timing: The 6-8 week cold stratification period is non-negotiable for anemone seeds, but don't worry i...
- Soil Mix Secrets: That 50/50 potting soil to perlite mix in Step 2 is crucial for preventing soggy roots, but here's ...
Frequently asked questions
Got questions about growing anemone flower seeds? You're not alone! Here are some of the most common inquiries—plus straightforward answers to help you cultivate these stunning blooms with confidence.
When is the best time to plant anemone flower seeds?
For the Pacific Northwest’s climate, sow seeds indoors in late winter (February–March) for transplanting outdoors after the last frost (typically April–May). If direct-sowing, wait until late spring or early summer when soil temps reach at least 60°F (15°C). Anemones are frost-hardy but need consistent moisture to germinate.
How long does it take for anemone seeds to germinate?
Germination can take 2–4 weeks under ideal conditions (warmth, moisture, and indirect light). Keep soil consistently damp (not soggy) and use a seed-starting heat mat if indoor temps dip below 65°F (18°C). Patience is key—some seeds may take up to 6 weeks!
Can I grow anemones from store-bought seeds or do I need special varieties?
Yes! Many Japanese anemones (Anemone hupehensis) and windflowers (Anemone coronaria) are available from reputable seed suppliers. For Pacific Northwest gardens, opt for native or hybrid varieties like Anemone nemorosa (wood anemone), which thrive in moist, partial-shade conditions. Avoid wild-collected seeds—they may not be true to type.
Are anemone seeds frost-resistant? Do I need to protect them?
While mature anemone plants are highly frost-tolerant, seeds and seedlings are delicate. If planting outdoors in early spring, use a light frost cloth until roots establish (about 4–6 weeks). Once established, anemones handle USDA Zones 3–9 with ease—perfect for PNW winters!
Why aren’t my anemone seeds sprouting? Troubleshooting tips.
Too cold?
Seeds need warmth (65–75°F / 18–24°C) to germinate. Try a seedling heat mat.
Dry soil?
Keep moisture consistent—use a spray bottle or humidity dome.
Old seeds?
Anemone seeds lose viability after 1–2 years. Store them in a cool, dry place if saving.
Light issues?
Seeds need indirect light; avoid direct sun until sprouts appear.
Pro tip: If all else fails, try stratification—mix seeds with damp sand and refrigerate for 4–6 weeks before planting.Wrapping up and next steps
Growing anemone flower seeds is a rewarding journey that brings vibrant color and life to your Pacific Northwest garden—especially for hummingbirds! 🐦⬛ With their frost-resistant blooms and low-maintenance nature, these beauties are perfect for both beginners and seasoned gardeners.
Whether you're drawn to their delicate petals or their ability to thrive in cooler climates, your garden will thank you for the effort.
Ready to plant your seeds? Start by gathering your supplies, following the steps above, and watch your garden transform into a hummingbird haven. Happy planting! 🌱