Flowers
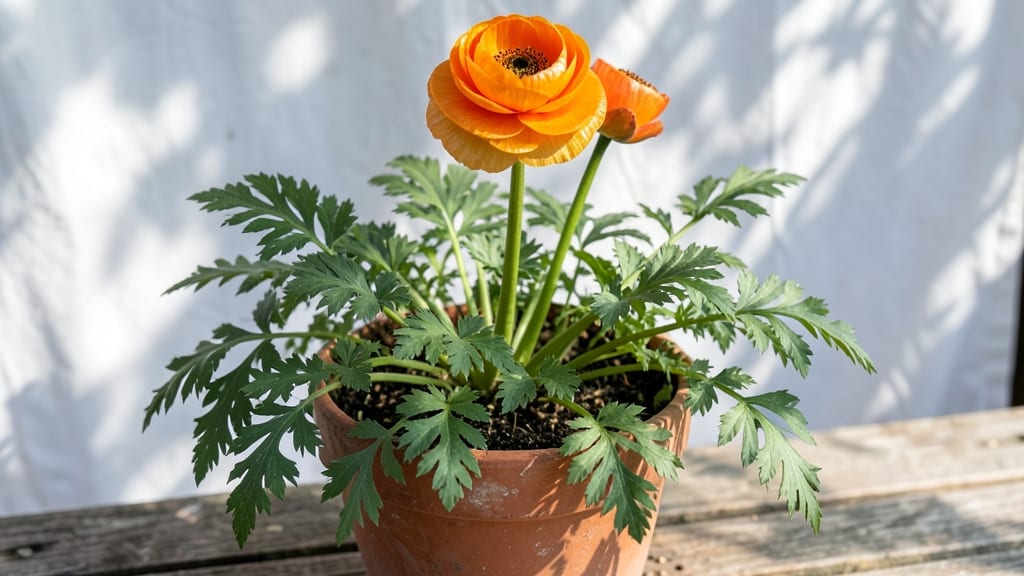
Orange ranunculus flowers burst with fiery warmth unlike any other variety—those layered, papery petals unfurl like a sunrise in your garden. 🌸 I’ve grown them for years, and their bold hue stands out against every backdrop, from cottage gardens to modern containers.
The secret to their success lies in timing and soil prep, not just wishful thinking.
These dramatic blooms thrive in cool weather, making them perfect for early spring or fall planting. They demand well-draining soil with a pH between 6.0 and 7.0, and their delicate stems need bright light for 6+ hours daily—no shady corners here.
The payoff? Three months of vibrant color that outshines most annuals.
What makes orange ranunculus special is their long vase life—cut stems last 10-14 days in water, making them ideal for bouquets. Unlike pastel varieties, their fiery tones demand center-stage placement, whether in garden beds or as striking cut flowers.
With the right care, they’ll reward you with weeks of continuous blooms that turn heads.
From soil prep to deadheading, I’ll walk you through every step—including how to troubleshoot those stubborn non-bloomers. Whether you’re a first-timer or a seasoned grower, these sun-kissed beauties are worth the effort. Let’s get those bulbs in the ground!
📚 In This Guide
- What you need
- Instructions
- Tips and common mistakes
- Wrapping up and next steps
What you need
- ● Orange ranunculus bulbs (corms): 10–20 bulbs (depending on desired coverage; opt for Ranunculus asiaticus hybrids for vibrant orange hues).
- ● Well-draining potting mix: 5–10 gallons (use a blend of peat moss, perlite, and compost for ideal aeration).
- ● Containers or garden bed: Containers: 6–12-inch pots with drainage holes (1–2 bulbs per 6-inch pot).
- ● Garden bed: Full sun to partial shade (4–6 hours of sunlight daily).
- ● Fertilizer: Balanced fertilizer (10-10-10): 1 tbsp per pot or 1 lb per 10 sq ft of garden bed.
- ○ Slow-release bulb fertilizer (optional): Follow package instructions for enhanced blooming.
- ● Watering can or hose with gentle spray nozzle: For consistent moisture without over-saturating.
- ● Pruning shears: For trimming dead foliage or spent blooms.
- ● Mulch: Straw or shredded bark to retain moisture and regulate soil temperature.
- ● Garden gloves: To protect hands while handling soil or bulbs.
- ● Plant supports (e.g., stakes or cages): For taller varieties that may need extra stability.
- ● Grow lights: If starting indoors in low-light conditions (12–14 hours of light daily).
- ● Floral preservative: For extending the life of cut stems (if harvesting for arrangements).
Step-by-Step instructions for growing orange ranunculus flowers
These velvety blooms thrive with patience and precision—here’s how to coax their vibrant color from seed to showstopper.
🌱 Step 1: Start Seeds Indoors at the Right Time
Ranunculus seeds need a long growing season, so begin them indoors 8-10 weeks before your last frost date. Fill 2-3 inch deep seed trays with a sterile seed-starting mix—never garden soil, which can harbor rot. Press the mix down lightly to remove air pockets, then moisten it until it feels like a damp sponge.
Sow seeds ⅛ inch deep in rows spaced 1 inch apart. A single seed packet yields 40-50 plants, so space them thinly. Mist the surface with water until evenly damp, then cover the tray with a clear plastic dome to retain warmth and humidity. Place the tray on a seedling heat mat set to 65-70°F—this jumpstarts germination in 10-14 days.
☀️ Step 2: Provide Light and Thin Seedlings
Once sprouts emerge, remove the dome immediately—excess moisture causes damping-off, a fungal disease that collapses seedlings overnight. Move the tray under a grow light positioned 2-3 inches above the plants for 14-16 hours daily. Without enough light, seedlings grow leggy and weak, with stems stretching toward the light source.
When seedlings develop 2-3 true leaves (the second set after the initial seed leaves), thin them to 1 plant per cell. Use clean scissors to snip unwanted seedlings at soil level—never pull, which disturbs roots. Label each tray with the variety and date to track growth progress.
🪴 Step 3: Harden Off and Transplant
Two weeks before your last frost, begin hardening off seedlings by placing them outside in a sheltered, shaded spot for 1-2 hours the first day. Gradually increase outdoor time by 1 hour daily until they tolerate full sun exposure. This slow acclimation prevents transplant shock, which can stunt growth.
Transplant seedlings into the garden after all danger of frost has passed and soil temperatures reach 50°F. Space them 4-6 inches apart in well-draining soil amended with compost. Water deeply at the base to encourage root establishment. Mulch with 1-2 inches of organic mulch to retain moisture and suppress weeds.
💧 Step 4: Water and Fertilize for Vibrant Blooms
Ranunculus roots are shallow, so water deeply 1-2 times weekly, aiming for 1 inch of moisture per week. Let the top 1-2 inches of soil dry between waterings—overwatering causes bulb rot. Use a drip irrigation system or water early in the morning to reduce fungal risks. Avoid wetting the foliage, which can promote mildew.
Feed plants with a balanced liquid fertilizer (10-10-10) every 2-3 weeks once buds form. Stop fertilizing 4-6 weeks before your first frost to allow blooms to mature. Deadhead spent flowers regularly to encourage continuous blooming—snip stems ½ inch above the bulb to redirect energy to new growth.
⏰ Step 5: Prepare for Overwintering and Next Season
Ranunculus bulbs are tender and won’t survive freezing temperatures. After the first frost blackens foliage, cut back stems to 1 inch above the soil. Gently lift bulbs from the ground, shake off excess soil, and let them dry in a shady, well-ventilated area for 1-2 weeks. Store them in a paper bag filled with dry peat moss in a cool (40-50°F), dark place until replanting in early spring.
Replant bulbs 6-8 weeks before your last frost date in well-draining soil with full sun exposure. With proper care, your ranunculus will reward you with vibrant orange blooms in just 90 days. Save a few bulbs each year to build a stunning, low-maintenance perennial display.
Tips & tricks for perfect orange ranunculus growth
Here's what nobody tells you about coaxing those velvety orange blooms—these insider tricks will help you avoid common pitfalls and grow showstopping flowers.
The Heat Factor: That 65-70°F heat mat temperature in Step 1 is non-negotiable for germination. I learned this the hard way—cooler temps delay sprouting by weeks, while hotter temps can cause seeds to rot. Place your tray on a thermometer to monitor consistently, and never exceed 75°F or you risk damping-off disease. The goal is steady warmth, not heat shock.
Lighting Secret: For those critical 14-16 hours of light in Step 2, I recommend using a full-spectrum LED grow light—it mimics sunlight more effectively than basic fluorescent bulbs. Position it 2-3 inches above the seedlings and adjust height as they grow. If you notice stems stretching toward the light (called "etiolation"), lower the light immediately. Leggy seedlings rarely recover their sturdy structure.
Transplanting Timing: When hardening off in Step 3, I always check soil temperatures with a thermometer before transplanting. 50°F is the absolute minimum—cooler soil stresses tender roots. If your garden soil runs cold, consider using black plastic mulch a week before transplanting to warm the soil naturally. Also, transplant on a cloudy day to reduce stress from direct sunlight.
Fertilizer Strategy: In Step 4, start fertilizing only after you see buds forming—early feeding encourages leafy growth at the expense of blooms. I use a half-strength 10-10-10 solution the first time to avoid burning tender roots. Once buds appear, you can increase to full strength every 2-3 weeks. The key is consistency: never skip a feeding once you start, or you'll get uneven growth patterns.
Pro Tips for Orange Ranunculus Flower
- Here's what nobody tells you about coaxing those velvety orange blooms—these insider tricks will help you avoid commo...
- The Heat Factor: That 65-70°F heat mat temperature in Step 1 is non-negotiable for germination. I learned this the ha...
- Lighting Secret: For those critical 14-16 hours of light in Step 2, I recommend using a full-spectrum LED grow light—...
Frequently asked questions
Got questions about growing these stunning orange ranunculus flowers? You’re not alone! Here are some of the most common inquiries—plus quick, practical answers to help you cultivate success.
How long does it take for orange ranunculus to bloom?
With the right care, you’ll see buds forming in about 60–90 days after planting (or 4–6 weeks from transplanting). Cooler temperatures (50–70°F) and consistent moisture speed up the process. Pro tip: Deadhead spent blooms to encourage nonstop color for weeks!
Why aren’t my ranunculus flowers opening?
If your orange ranunculus stays in bud form, it’s often due to heat stress (above 80°F) or lack of light. Try moving pots to a shadier spot or providing afternoon shade. Overwatering can also cause buds to rot—let soil dry slightly between waterings. Fix: A light fertilizer boost (like 10-10-10) can jumpstart growth!
Can I grow orange ranunculus in containers?
These flowers thrive in well-draining containers (at least 6 inches deep) with a mix of potting soil and perlite. Use pots with drainage holes and place them where they get 4–6 hours of sunlight daily. Container hack: Group 3–5 bulbs per pot for a lush, cascading display!
What’s the best alternative if orange ranunculus is hard to find?
If orange ranunculus is sold out, try these vibrant alternatives with similar care needs:
- Calendula (edible, cheerful orange blooms, drought-tolerant)
- Gerbera daisies (bold colors, loves full sun)
- Tulips (Parrot variety) (exotic petals, spring blooms)
- Zinnias (long-lasting, attracts pollinators)
Do ranunculus bulbs need winter care?
In USDA Zones 8–10, ranunculus bulbs can stay in the ground year-round. In colder zones (below 20°F), dig them up after foliage dies back, dry them, and store in a cool, dark place (like a paper bag in the fridge). Replant in early spring for next year’s blooms. Warning: Avoid storing in plastic—it traps moisture and causes rot!
Wrapping up and next steps
The orange ranunculus flower is a stunning addition to any garden, offering vibrant color and delicate charm in just 90 days! With the right care—well-draining soil, bright light, and consistent moisture—you’ll be rewarded with lush blooms that brighten up every season.
Whether you’re a beginner or a seasoned gardener, these cheerful flowers prove that beauty grows with patience and a little know-how. 🌸
Ready to dive in? Start by gathering your supplies and plant your first batch today—your garden (and future bouquets!) will thank you. Happy growing! 🌱